The Right Way to set up NAT in EC2
Considering that it’s one of those things probably every single person using a VPC is going to need to do at some point, it’s amazing that the process for setting up a NAT router in EC2 is so incredibly cumbersome.
Like me, you probably Googled for a quick solution to this problem and found Amazon’s complicated HOWTO on the topic. Then, at some point around hour 3 of trying to parse your way through it, you realized that it doesn’t provide any kind of multi-AZ redundancy, so you went back to Google and found an even longer and more complicated article (from 2013) explaining how to set up a reduntant NAT using CloudFormation and a Bash shell script.
Seriously?
This seemed like the perfect use case for Chef search and a nice, clean Ruby script. This blog post will explain the process of putting that together and (if you just want to get it working) how to make our solution work for you.
The Basic Requirements
- No single points of failure
- Act as a NAT (routing all traffic out through a single IP and accepting inbound related/established connections)
- Allow SSH access (for admin purposes)
- No pets: Should be rebuildable with a single command
- Everything in source control
How do we achieve all this?
Chef, of course! But lets talk about how we got there…
Prerequisites
At least one VPC
Duh.
Public and Private Subnets and Route Tables
Here’s how the basic topology works:
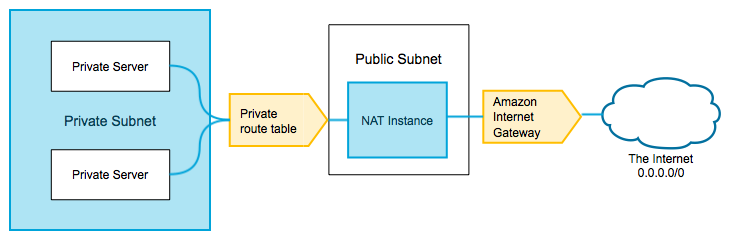
A NAT essentially routes connection requests from a private subnet to a public one, so you’ll need at least one of each in order to make this work. Whether a subnet is “public” or “private” has entirely to do with whether it is assigned a public or private route table.
- A public route table is one where the
0.0.0.0/0destination points to an Internet Gateway. In our setup we named this routeDirect Internet Access. - A private route table is one where the
0.0.0.0/0destination points to a NAT instance (in this case, the NAT instance you’re about to set up). In our setup we named this routeNAT Internet Access
If you have already set up your VPC and are actually using it, you probably already have at least one public subnet.
Go ahead and set up a new route table now but don’t worry about assigning a destination yet. This is going to become our private route table. Next, make this new route the “Main” route for your VPC. Next, make sure that your existing “public” route is “Explicitly associated”
When you’re done you should have:
- A route table with a destination of
0.0.0.0/0with an Internet Gateway as a target (your “Internet” route). - A route table with a no
0.0.0.0/0destination (this will be your “NAT” route). - Your NAT route should have an explicit
Subnet Associationwith a designated “Private” subnet. - Your Internet route should have 0 subnet associations, and it should be set as the “Main” table for your VPC.
An IAM role for the NAT boxes
You’ll need this in order to send API calls from your instance. This is needed for the HA functionality, which we’ll cover later.
I created one role called nat-ha and attached two policies:
To allow the instance to set its own “Source/Dest check” attribute…
modify_network_interfaces:
1 2 3 4 5 6 7 8 9 10 11 12 | |
and to allow the instance to make routing changes…
NAT_Takeover:
1 2 3 4 5 6 7 8 9 10 11 12 13 14 15 16 17 18 | |
Setting up the NAT
I was pretty displeased with the offering from Amazon, so like any experienced engineer, I decided it would be better to invent a totally new solution from scratch!
Build a new EC2 instance
This part is pretty basic. You’ll want to create a dedicated instance with the following characteristics:
- Decent network I/O
- A public (aka. “elastic”) IP address bound to the primary ENI (i.e. eth0). This ENI must be in your “public” subnet.
- Source/Destination check set to “false”
Configure the instance
Make some changes to sysctl
ip_forward should be enabled and send_redirects should be disabled for your NAT adapter (eth0 in this case).
To set this permanently, place both properties in a file called /etc/sysctl.d/nat.conf like so:
1 2 | |
And then to make things live right away:
1
| |
Enable up IP Masquerading
Create a file called /etc/iptables.rules with the following content:
1 2 3 4 5 6 7 | |
Make the rules live with the following command:
1
| |
Create the following file at /etc/network/if-pre-up.d/iptables_load to make sure that the rules are loaded automatically after the network adapter (e.g. on restart):
1 2 3 | |
All of these steps are handled automatically in our et_nat::iptables chef recipe.
Route traffic through your new instance
Your new instance should now be able to route traffic, however in order to you use it you will need to modify your private route table to send Internet-bound traffic through your new NAT instance.
In the VPC Dashboard under “Route Tables”, Select your “NAT” route table, go to the “Routes” tab and click “Edit”. For the new rule, set the destination to 0.0.0.0/0 and the target to the instance ID of your newly created NAT instance. Click Save.
Congratulations! Hosts in your “private” subnet should now be able to access the Internet through your NAT instance.
Making it HA
Given that your whole infrastructure is going to depend on this thing for its Internet access, it’s pretty important that this thing be available FOR ALWAYS.
Let me show you how we did that…
The nat_monitor script
The challenge here is that a node not only has to be online, but must also be reachable by other nodes. Naturally, we settled on a three node cluster for its resilience in split-brain scenarios. To manage the cluster state we created a gem called nat monitor.
How nat-monitor works
- Every ten seconds (by default; configurable), each nat-monitor host checks to see if it is the master (meaning that the NAT route already lists it as a target for
0.0.0.0/0) - If it is a master, it goes back to sleep for ten more seconds
- If it’s not, it pings the other two hosts in the cluster
- If it can’t reach either node, it assumes that it is the node that has been isolated, and goes back to sleep.
- If it reaches only one node, it checks to see if the unreachable node is a master.
- If that node is a master, it steals the route from that node (making itself the master) and goes back to sleep.
- If that node is not a master, it goes back to sleep.
The concern was raised that this creates the possibility of a race condition because two nodes might try to assume the route at the same time. We decided not to worry about this because there is little harm if the route changes hands twice, and a race condition in this type of cluster would not cause the route to change hands a third time.
The one remaining problem to solve was how to discover the other nodes in the cluster. Since the script has access to the EC2 API, there are a few options available to you here. One possibility was to set a special tag on new NAT servers and have the nat-monitor script look for hosts with that tag. Tagging is a great approach, but it isn’t really part of our existing server bootstrapping workflow, so we decided to use Chef for this instead.
Handling node discovery
To handle node discovery, we wrote a Chef recipe called et_nat::ha. It uses Chef’s search feature to look for other nodes with a matching cluster and environment name and then places that list (along with the relevent route table ID) in a YAML file which gets read by the nat monitor. To prevent confusing and invalid situations, it only tries to set up the monitor script if more than 2 nodes are found in the cluster.
Misc other housekeeping
We’re also using Chef to install a service script for stopping and starting the nat monitor (and to make sure it runs at reboot).
That’s it!
If you don’t want to bother with reading all of that, you can just add the et_nat cookbook to your run list and your host should pick it up from the Supermarket and things should “just work” (note that you will still need to do the route table setup part yourself).